Herramientas de usuario
Barra lateral
es:classic:importing_images
¡Esta es una revisión vieja del documento!
Tabla de Contenidos
Importación de imágenes
To use StudioLine for your images, they need to be added to the StudioLine Image Archive. StudioLine offers two methods for managing images:
Modo "Copiar"
Images from an external source like a camera or CD are copied into the StudioLine Image Archive. Once copied we refer to them as internal images.
Once StudioLine has created this master-copy in the Image Archive, you could decide to delete the original image. A practical example would be the memory chip of your digital camera. After importing photos into StudioLine, the camera’s memory chip could be erased to make room for new pictures.
Digital camera users should always operate in “Copy” mode. Some cameras may reuse the same file names each time the memory chip is erased, for example DSCF0001.jpg. Next time you copy your picture files to a Windows folder that already contains prior images from your camera, Windows may encounter duplicate file names and offer to overwrite the older pictures. This may cause you to accidentally lose irreplaceable memories. This is never an issue when you import your pictures directly into StudioLine using the “Copy” mode, since identical file names pose no problem to StudioLine.
The “Copy” mode is suited for all data storage media because it is the safest. External programs have no access to the StudioLine data files. Your files can not be accidentally changed or deleted.
Modo "No copiar"
The actual image resides outside of StudioLine’s Image Archive, and only references to these original images are copied into the Image Archive. We refer to them as external images. Sometimes an original image is located on removable media or is temporarily unavailable for other reasons, StudioLine therefore generates a “Proxy Image” much like a thumbnail in the Image Archive. Settings regarding proxy images are found in the “Preferences” menu.
The “Don’t Copy” mode should only be chosen if you prefer not to delete your original images from your hard disk and can’t afford the additional disk space for StudioLine to create its master-copies. If you chose this mode for CDs, DVDs or other removable media, especially your camera, then you may find it inconvenient to always have to keep these media close at hand. The risk is very high that you accidentally erase or overwrite images on such media. Again, your digital camera is a good example. Furthermore, every time you need to create a high-resolution print or want to export the image, StudioLine would prompt you to insert the disc or connect your camera.
It is generally recommended that you use the “Copy” mode as long as you have available disk space. Once disk space gets sparse, StudioLine offers the offload feature for older or less frequently used images.
Your choice of internal vs. external images has no bearing on your ability to manage, edit, and process your pictures with StudioLine.
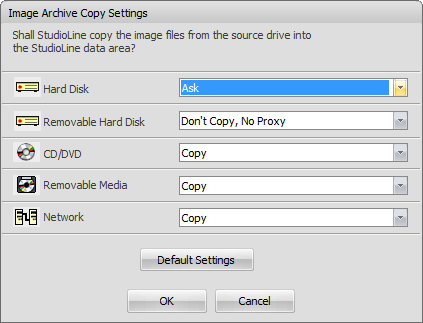 You can decide how StudioLine will manage your images in accordance with the different types of media you choose. Select “Image Archive Copy Settings” from the Menu Bar “Preferences”. (The “Image Archive Copy Settings” window will open automatically the first time you load images).
In addition to setting “Copy” and “Don’t Copy” modes, you can also choose to be prompted during each import simply by selecting the setting “Ask”. This is a good choice if you want to be able to copy images from borrowed CDs, but not copy images from any CDs that you own.
You may change your settings at any time. Of course, this would only effect any new images still to be added to the Image Archive. Existing images stored internally may be converted to external images at any time, as well as external images to internal ones, as long as you still have access to your originals.
El almacenamiento de imágenes interno y externo
To convert internally-stored images to externally-stored ones, or vice versa, select the images and click on one of the images with the right mouse button. Choose “Original” from the context menu and then the option “Store Externally” or “Store Internally”.
To move an image to external storage, you will need to select a target folder.
To import an image to internal storage, you may be asked to insert the appropriate CD, DVD or other removal media, if that’s where the original picture resides.
Importación de imágenes con el Asistente de cargo
Uso del Asistente de cargo de StudioLine ahorra mucho tiempo y esfuerzo, porque usted decide antes de la transferencia se inicia cuales imágenes, imágenes con anotaciones de sonido y archivos de película que desea cargar en su archivo.
Al iniciar StudioLine, el Asistente de carga reconoce automáticamente todos los archivos ubicados en la carpeta “DCIM” de una unidad externa (por ejemplo, tarjeta de memoria de su cámara) que se conecta a su computadora.
En la vista previa, todas las imágenes encontradas se muestran como imágenes en miniatura que le permite reconocer fácilmente sus archivos. Películas y archivos de sonido son presentados con un icono. El uso de este resumen, seleccione los archivos que le gustaría importar a StudioLine mediante el uso de los siguientes medios fáciles:
Al abrir el Asistente de carga, todos los archivos se comprueban de forma automática para la carga. Para eliminar archivos individuales no querían, simplemente desactive ellos.
Para desactivar o volver a comprobar todos los archivos, haga clic con el botón derecho del ratón en el área de previsualización de la imagen y elegir el comando correspondiente en el menú contextual.
También puede utilizar la combinación de teclas “Ctrl + A” para seleccionar todos los archivos, a continuación, marcando una de las casillas bajo la miniatura para establecer los controles para todos.
Usando su ratón usted puede arrastrar y alternativamente seleccionar un grupo de archivos. Al hacer clic en archivos individuales, mientras mantiene presionada la tecla “Ctrl” le permite añadir o eliminar de la agrupación. Una vez que haya hecho su selección total, el botón derecho del ratón en la selección y elija “Marcar seleccionado” o como sea el caso, “Marcar no seleccionado”.
En el lado derecho del panel de asistente de establecer el destino de las imágenes cargadas. El uso de “Buscar” se puede recoger una carpeta existente en el interior del archivo. Es posible que desee crear una subcarpeta y tener los archivos cargados en ella.
Es posible cambiar el nombre de las imágenes durante la carga - si lo desea, con el fin numeradas consecutivamente. De esta manera sus imágenes tiene un nombre significativo desde el principio, mientras que la prevención de los futuros trabajos en el proceso.
Las versiones anteriores de Windows sólo permiten el Asistente de carga a ser convocado de forma manual. Hay dos maneras de hacer esto:
Siga la ruta del menú: “Archivo” → “Importar” → “Asistente de carga.”
En la barra de menús, haga clic en Archivo y seleccione el Explorador de StudioLine. sin haber seleccionado un archivo, en el icono “Load Image”.
Recargar imagen original
If you are in the Image Archive you can go to the Image menu and the Reload Source Image tab. This option allows you to reload the graphic data that was originally imported into StudioLine. If available, StudioLine searches for the data in its original position. If the files can't be found and only one image is selected, the user is prompted to search for the files in the StudioLine Explorer - Image Archive.
This function can improve the image quality after a small piece of the image has been first cut and then increased in size. Through the subsequent download function the original graphic files are restored and the cut out area is saved in the highest resolution as defined by the Image Rendering settings, found under the Preferences menu. If you are working with Kodak Photo-CD the best suited resolution is uploaded.
es/classic/importing_images.1415804052.txt.gz · Última modificación: 2014/12/17 14:25 (editor externo)