Herramientas de usuario
Barra lateral
¡Esta es una revisión vieja del documento!
Tabla de Contenidos
Vista de mapa
StudioLine can display images that have been tagged with locations, called Geotagging. You can link GPS data to images by location or Geotagging in StudioLine. In order to do this, images loaded into the Image Archive need to have an appropriate GPS log file in the GPX- or NMEA-0183 format. This is the same file format used by Navigation devices.

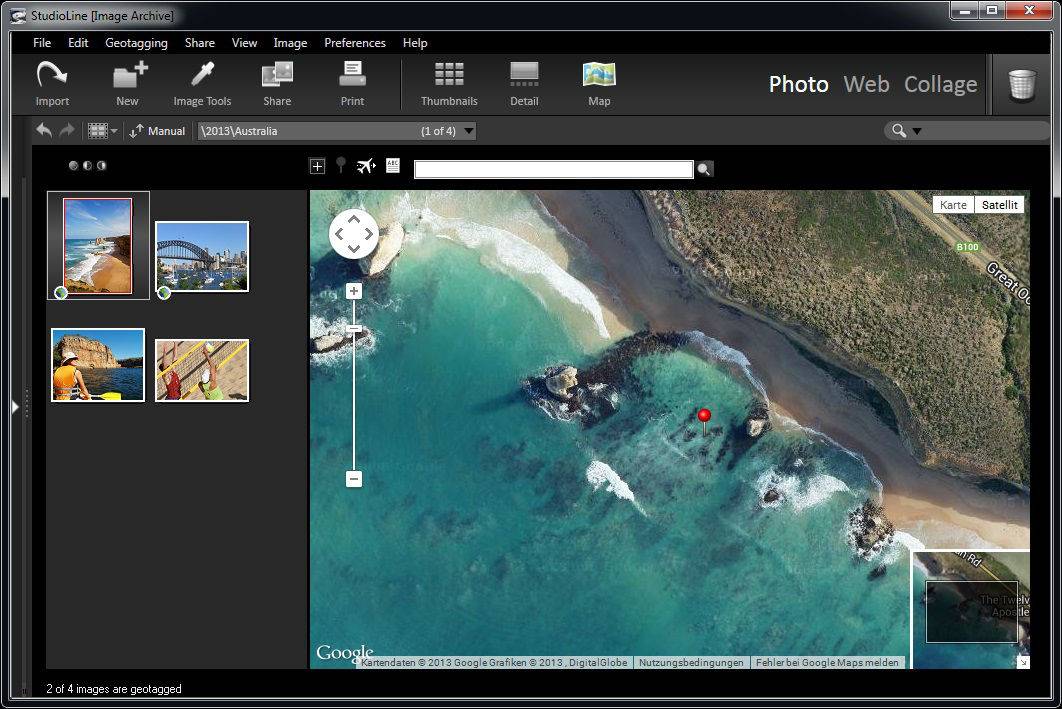
To open the Map View, simply click on the “Map” button in the Button Bar. The Image Archive pane displays all of the images in your selected folder as thumbnails in a left-hand panel, with a Google map on the right. Images in your folder that are already Geotagged will have a small icon in the lower-left hand side of the image. The Google map in the right-hand pane will automatically display the image's position on the map and mark it with a blue arrow.
If you have tagged your image, you can view the position on Google Maps by clicking on the Geotag button below the image in Image Archive. This will launch the Map View and the image's location will be displayed in Google maps on the right.
For images that need to be Geotagged, simply type in the name of the location in the menu bar, and the Google map will automatically position itself there. You can fine tune the location by zooming in and out on the map and using the cross-hair to specify exactly where the location should be marked.
Once you have found your location on the map, and positioned the cross-hair exactly on the intended place, then you can use the 'apply position' button to Geotag the image. All the images currently selected will then acquire that Geodata. The name for this location will be automatically acquired via the internet (GeoNames). For images that already have GPS coordinates associated with them, but need the name of the location to be included in the descriptor, simply click on the Retrieve Location Names button. The location names will be acquired and assigned to the image.
In order to view the Geotagged positioning of more than one image at once, click on the Optimize Scale button and the Google map will be adjusted to include all the locations of your currently selected photos on one map.
Importing and Exporting a Geotagged Image in .KML
KML is a file format used to display geographic data in an Earth browser such as Google Earth, Google Maps, and Google Maps for mobile. If you want to upload your geotagged images to Google Maps or Google Earth, simply select them in the Image Archive, right-click and go to the Geotagging/Create KML file with thumbnails. A .kml file is then generated that allows you to upload the your image to any of these commerical programs for viewing online. This is particularly useful if you want to create a web gallery that indicates the location where the image was created on a map.
You can also import .kml data and images from third parties by going to the Geotagging menu and selecting Import KML file.
Mostrar su imagen etiquetada geográficamente en Google Map/Google Earth
Alternativamente, usted puede seleccionar una imagen e ir a Mostrar la posición de la imagen en Google Maps en el menú Geoetiqueta. Esto abrirá el navegador y tire hacia arriba de los mapas de Google. Allí tiene usted un número de maneras en que usted puede ver la posición. Ya sea a través de un mapa típico, a través de satélite (que le da una imagen de la ubicación de satélite) o como un mapa del terreno.
Por último, si ha instalado Google Earth, usted tiene la opción de ver la ubicación de su imagen a través de la Posición Mostrar imagen en Google Earth en el menú Geoetiqueta. Si usted no tiene el programa instalado, la ficha del menú aparecerá atenuado. Este programa le permite ver la posición de una variedad de puntos de vista 3-dimenstional.
Etiquetado automático
En el menú Geoetiqueta, seleccione Importar geodato desde el archivo (kml) y la siguiente ventana se abrirá:
Seleccione los archivos que incluyen los datos del GPS. Utilizando el principio y el fin de los tiempos de los-datos del GPS, se seleccionan todas las imágenes que siguen estos parámetros y se colocan en la ventana de geoetiquetado. La diferencia entre el GPS-datos y la fecha de la imagen y el tiempo de la creación se hace clara. Si la creación fecha es un tiempo en el pasado, o las imágenes fueron tomadas en un viaje al extranjero, se puede evaluar la hora correcta a través de la ventana de diferencia horaria. El signo de la corrección de tiempo se puede ajustar. 'Minus' designa un lugar de creación del este del Meridiano de Greenwich, 'más' indica al oeste de la misma. Por supuesto, esto es todo depende de tener un reloj ajustado correctamente en la cámara.
Elija una imagen de las imágenes en miniatura para que muestra información de la ubicación, y la posición relativa en la ventana. En el mapa de Google, se muestra la información de ubicación de la imagen. Si esta posición coincide con la ubicación real de creación, puede hacer clic en el botón de posición de aplicar para etiquetar la imagen.
