Outils pour utilisateurs
Panneau latéral
Ceci est une ancienne révision du document !
Table des matières
Collage
les pages d'impression pré-formatées ne sauraient couvrir toutes les idées créatives dont vous pourriez faire preuve. Par conséquent, StudioLine vous permet de concevoir vos propres pages d'impression. Avec la “Disposition libre”, vous pouvez placer librement vos images et textes sur une page blanche.
Sélectionnez une image que vous souhaitez utiliser pour votre projet d'impression, cliquez sur le bouton “Nouveau” de la barre d'outils menus et choisissez “Carte, calendrier”, ce qui ouvrira la fenêtre “Styles d'impression”. Choisissez “Disposition libre” et “Nouvelle page”. Alternativement, vous pouvez cliquer sur le bouton “Nouveau” et choisir “Collage” pour passer la sélection de style.
Après avoir cliqué sur “Continuer” vous passez à la fenêtre “Créer un nouveau collage” ou vous pourrez saisir le nom de votre projet. Cliquez sur “OK” pour continuer.
En utilisant la fenêtre “Propriétés de la page”, vous définissez le format de la page de votre projet. Vous pouvez ensuite consulter et modifier ces paramètres en choisissant “Propriétés de la page” dans le menu “Fichier” de la barre de menus. Lorsque vous avez terminé, cliquez sur “OK” pour accéder à une page vierge dans l'éditeur de page de StudioLine.
La zone blanche représente le format de papier que vous avez choisi.
Pages d'impression
Les pages d'impression permettent d'imprimer des couvertures et inserts de boîtiers CD, des cartes de vœux et des calendriers. Selon le type de page voulu, sélectionnez une ou plusieurs images, puis cliquez sur “Imprimer | Pages d'impression” depuis le menu “Fichier”.

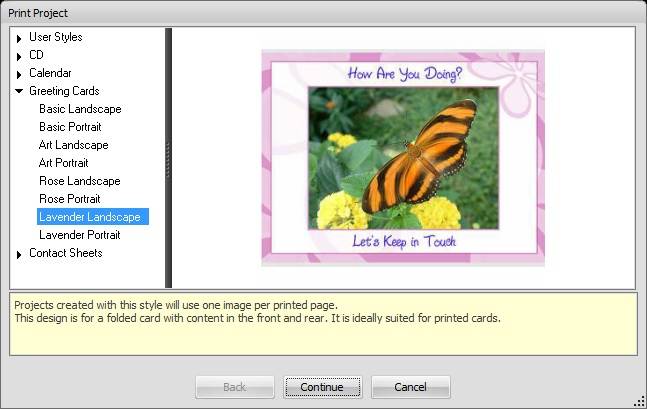
Dans la fenêtre “Pages d'impression”, choisissez un des styles disponibles dans les différentes catégories.
CD Covers and Inserts
The “CD” category offers templates for a CD index and front and back covers. For the covers select a single image; for the index you may choose up to 30 images. After choosing a style, enter a name for your project. Click “Continue” and you will be prompted for additional text required by your project. Next, StudioLine will compose the print output and display the Page Editor.
The CD index cannot be modified in the Page Editor, but you can change pictures and text for the CD covers.
Greeting Cards
This category offers greeting card templates in portrait and landscape format. Choose only one image – if more than one image is selected, then the first one will be used.
After choosing a style, enter a name for your project. Click “Continue” and you will be prompted for additional text called for by your project. Next, StudioLine will compose the print output and display the Page Editor, where you can still change the picture and edit the text.
Calendars
This category offers templates for calendar pages and covers. For the cover, choose a single image. For calendar pages, choose up to 12 images.
After choosing a style, choose the calendar year and starting month. By default, StudioLine will start with month number 1 – January. Next, enter a name for your project. Click “Continue” and you will be prompted for additional text required by your project. As you continue, StudioLine will compose the print output and display the Page Editor.
In the Page Editor, you can still change the picture for calendar pages and the cover. In addition you may edit the text for calendar covers.
If you are creating multiple calendar pages, then the first page will appear in the Page Editor. The “StudioLine Explorer – Pages” will also open. Right-click on one calendar page at a time, then choose “Open” from the context menu to review, edit, and print each calendar page.
Editing
Depending on the style chosen for your project, you may be able to update certain aspects in the “Page Editor.”
To edit text, click “Edit” in the QuickStep Bar. Each click will offer a different text element for editing.
To replace a picture, open the “StudioLine Explorer – Image Archive and browse for a suitable picture. Drag the replacement picture from the StudioLine Explorer panel to the old picture in the Page Editor. The image is automatically replaced.
Printing
Once you are happy with your pages, click “Print” on the QuickStep bar to open the “Standard Print” panel.
First choose from the available printers, if more than one is connected to your computer. You can click the “Settings” button to access the printer specific options. Click “Continue” to proceed with printing.
Accessing or Deleting Collages
Your print projects are available for review and printing in the future. To access previously saved projects, click the “Collage” icon in the toolbar. A list of previously saved collages will appear. Simply click on a collage in the list in order to open it for editing.
To delete a collage, drag it from the list to the Recycle Bin, or right-click on the collage and choose “Delete” from the context menu.
Emailing and Exporting Collages
Print projects can be sent by email directly from within StudioLine and can be exported. Simply click the “Share” button in the tools bar and choose the email or export function.
- For email use, StudioLine renders your print project into a graphics file. You control the file format and size. For more information about email settings, refer to the earlier chapter “Sending Images via Email.”
- For export, StudioLine renders your collage as a high resolution graphics file. You control the file format and pick a target location on our disks.
