Sidebar
classic5:importing_images
Table of Contents
Importing Images
To use StudioLine for your images, they need to be added to the StudioLine Image Archive. StudioLine offers two methods for managing images:
"Copy" Mode
Images from an external source like a camera or CD are copied into the StudioLine Image Archive. Once copied we refer to them as internal images.
Once StudioLine has created this master-copy in the Image Archive, you could decide to delete the original image. A practical example would be the memory chip of your digital camera. After importing photos into StudioLine, the camera’s memory chip could be erased to make room for new pictures.
Digital camera users should always operate in “Copy” mode. Some cameras may reuse the same file names each time the memory chip is erased, for example DSCF0001.jpg. Next time you copy your picture files to a Windows folder that already contains prior images from your camera, Windows may encounter duplicate file names and offer to overwrite the older pictures. This may cause you to accidentally lose irreplaceable memories. This is never an issue when you import your pictures directly into StudioLine using the “Copy” mode, since identical file names pose no problem to StudioLine.
The “Copy” mode is suited for all data storage media because it is the safest. External programs have no access to the StudioLine data files. Your files can not be accidentally changed or deleted.
"Don’t Copy" Mode
The actual image resides outside of StudioLine’s Image Archive, and only references to these original images are copied into the Image Archive. We refer to them as external images. Sometimes an original image is located on removable media or is temporarily unavailable for other reasons, StudioLine therefore generates a “Proxy Image” much like a thumbnail in the Image Archive. Settings regarding proxy images are found in the “Preferences” menu.
The “Don’t Copy” mode should only be chosen if you prefer not to delete your original images from your hard disk and can’t afford the additional disk space for StudioLine to create its master-copies. If you chose this mode for CDs, DVDs or other removable media, especially your camera, then you may find it inconvenient to always have to keep these media close at hand. The risk is very high that you accidentally erase or overwrite images on such media. Again, your digital camera is a good example. Furthermore, every time you need to create a high-resolution print or want to export the image, StudioLine would prompt you to insert the disc or connect your camera.
It is generally recommended that you use the “Copy” mode as long as you have available disk space. Once disk space gets sparse, StudioLine offers the offload feature for older or less frequently used images.
Your choice of internal vs. external images has no bearing on your ability to manage, edit, and process your pictures with StudioLine.
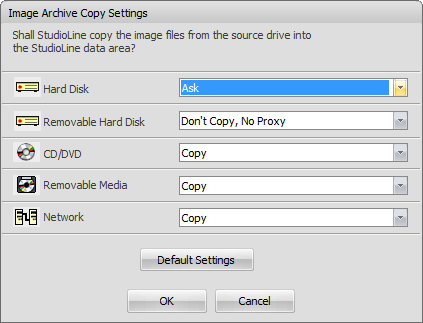 You can decide how StudioLine will manage your images in accordance with the different types of media you choose. Select “Image Archive Copy Settings” from the Menu Bar “Preferences”. (The “Image Archive Copy Settings” window will open automatically the first time you load images).
In addition to setting “Copy” and “Don’t Copy” modes, you can also choose to be prompted during each import simply by selecting the setting “Ask”. This is a good choice if you want to be able to copy images from borrowed CDs, but not copy images from any CDs that you own.
You may change your settings at any time. Of course, this would only effect any new images still to be added to the Image Archive. Existing images stored internally may be converted to external images at any time, as well as external images to internal ones, as long as you still have access to your originals.
Internally- and Externally-Stored Images
To convert internally-stored images to externally-stored ones, or vice versa, select the images and click on one of the images with the right mouse button. Choose “Original” from the context menu and then the option “Store Externally” or “Store Internally”.
To move an image to external storage, you will need to select a target folder.
To import an image to internal storage, you may be asked to insert the appropriate CD, DVD or other removal media, if that’s where the original picture resides.
Importing Images Using the Load Assistant
Using the StudioLine Load Assistant saves much time and effort, because you decide before the transfer begins which images, images with sound annotations, and movie files you actually wish to load into your archive.

When starting StudioLine, the Load Assistant automatically recognizes all files located in the “DCIM” folder of an external drive (for example your camera’s memory card) the moment you connect it to your computer.
In the image preview, all found images are displayed as thumbnail images enabling you to easily recognize your files. Movies and sound files are presented with an icon. Using this overview, select the files which you would like to import into StudioLine by using the following easy means:
Upon opening the Load Assistant, all files are automatically checked off for loading. To remove individual files not wanted, simply uncheck them.
To uncheck or recheck all files, click with your right mouse button in the image preview area and choose the appropriate command from the context menu.
You could also use the keyboard combination “Ctrl+A” to select all files, then checking off one of the boxes under a thumbnail to set the checks for all.
Using your mouse you could alternatively drag and select a grouping of files. Clicking on individual files while holding down the “Ctrl” key allows you to add or delete from the grouping. Once you have made your total selection, right-click into the selection and choose “Check Selected” or as the case may be, “Uncheck Selected.”
On the right side of the assistant panel set the destination for the loaded images. Using “Search” you can pick an existing folder inside the archive. You may wish to create a subfolder and have the files loaded into it.
It is possible to rename the images while loading – if you wish, in consecutively numbered order. This way your images have a meaningful name right from the start, while preventing future work in the process.
Older Windows versions only allow the Load Assistant to be summoned up manually. There are two ways to do this:
Follow the menu path: “File” → “Import” → “Load Assistant.”
Open the StudioLine Explorer under File in the Menu Bar and click, without having selected a file, on the “Load Image” icon.
Reload Source Image
If you are in the Image Archive you can go to the Image menu and the Reload Source Image tab. This option allows you to reload the graphic data that was originally imported into StudioLine. If available, StudioLine searches for the data in its original position. If the files can't be found and only one image is selected, the user is prompted to search for the files in the StudioLine Explorer - Image Archive.
This function can improve the image quality after a small piece of the image has been first cut and then increased in size. Through the subsequent download function the original graphic files are restored and the cut out area is saved in the highest resolution as defined by the Image Rendering settings, found under the Preferences menu. If you are working with Kodak Photo-CD the best suited resolution is uploaded.
classic5/importing_images.txt · Last modified: 2021/04/26 11:36 by 127.0.0.1