Seitenleiste
de:classic:image_preprocessing
Dies ist eine alte Version des Dokuments!
Inhaltsverzeichnis
Bildvorverarbeitung
Unter „Bildvorverarbeitung“ finden Sie im Fenster „Filter“ die passenden Werkzeuge, um Bilder zu drehen, auszurichten, unerwünschte Ränder abzuschneiden und sowohl die berüchtigten Roten Augen beim Menschen, als auch die verschiedenen Farben von Tieraugen bei Blitzaufnahmen zu korrigieren.
Da die Anwendung dieser Filter nur auf einzelnen Bildern und nicht auf gan-zen Bildgruppen sinnvoll ist, erscheinen diese nicht in der im Absatz „Aktive Filter“ beschriebenen Liste.
Schneiden und Drehen
 Um Bilder um 90° zu drehen, markieren Sie diese und klicken in der Fußleiste auf die Schaltflächen „Im Uhrzeigersinn drehen“ oder „Gegen den Uhrzeigersinn drehen“. Mit dem Anklicken der Symbole verändern Sie gleichzeitig die Einstellungen des Filters „Schneiden und Drehen“.
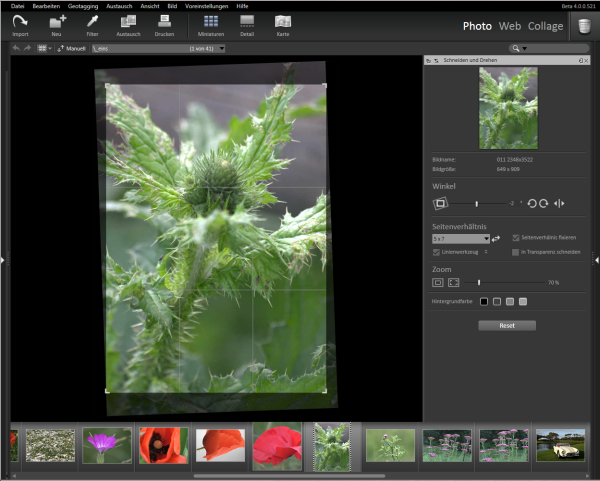
Den Filter „Schneiden und Drehen“ aus der Bildvorverarbeitung nutzen Sie für die verschiedensten Aufgaben:
- Bilder rotieren
Hochformatbilder, die von einer Digitalkamera ohne Orientierungssensor kommen, müssen meist um 90° gedreht werden. - Bilder spiegeln
Diese Möglichkeit ist z.B. dann sinnvoll, wenn ein Dia verkehrt im Diascanner eingelegt war. - Bilder zurechtschneiden
Mit Hilfe der Bildbegrenzungslinien in der Bildvorschau des Fensters können Sie z.B. Ränder, die vom Einscannen eines Bildes stammen abschneiden oder den Bildausschnitt neu festlegen. - Bildinhalte ausrichten
Wurde beim Fotografieren die Kamera nicht gerade gehalten oder ein Bild schief eingescannt, können Sie es mit dem Gerade Ausrichten Werkzeug an einer Linie ausrichten.
 - Seitenverhältnis definieren
Möchten Sie ein bestimmtes Seitenverhältnis für ein Bild festlegen, geben Sie unter „Seitenverhältnis“ die gewünschten Werte ein und aktivieren die Schaltfläche „fixieren“. Die Schieberegler arbeiten beim Einstellen des Bildausschnittes jetzt so, dass das eingestellte Seitenverhältnis nicht verändert wird.
Rote Augen Korrektur
 Ein leidiges Thema, das wohl jeder kennt, der schon einmal Personen mit Blitzlicht fotografiert hat, sind die roten Augen. Um diesen Effekt zu korrigieren, öffnen Sie die Bildvorverarbeitung „Rote Augen Korrektur“.
Klicken Sie in der linken Bildansicht „Bereich auswählen“ auf eines der roten Augen. In der rechten Bildansicht „Rote Augen auswählen“ wird der gewählte Bereich vergrößert dargestellt, so dass Sie den eigentlichen roten Bereich gut anklicken können. Klicken Sie in der rechten Bildansicht „Rote Augen auswählen“ mit der Maus genau in den roten Bereich des Auges.
StudioLine korrigiert das rote Auge. Sollte das Ergebnis nicht Ihren Vorstellungen entsprechen, können Sie manuell korrigieren:
Der Regler „Farbtoleranz“ erweitert oder verkleinert den zu korrigierenden Bereich, wenn nicht die komplette rote Fläche verändert, bzw. zu viel korrigiert worden ist.
Mit dem Regler „Korrektureffekt“ können Sie die Intensität der Korrektur verstärken oder abschwächen.
Für das nächste Auge wiederholen Sie diese Arbeitsschritte. Auf diese Weise korrigieren Sie beliebig viele Augen in einem Bild. Jedes korrigierte Auge erhält eine Nummer, so dass Sie es gezielt wieder auswählen und eventuell nachkorrigieren können. Soll für ein bestimmtes Auge der Effekt gelöscht werden, wählen Sie das Auge im Feld „Auge Nr.“ aus und klicken auf die Schaltfläche „löschen“. Alle Einstellungen des Fensters löschen Sie wie gewohnt, indem Sie die Schaltfläche „Übertragen“ auf das Papierkorbsymbol ziehen.
Die Korrektur funktioniert auch auf Tieraugen, die nicht rot, sondern z.B. grün leuchten. Das Fenster erkennt automatisch, wenn eine andere Farbe korrigiert werden muss.
ICC-Farbprofile
ICC color profiles are based on a vendor-independent standard by the International Color Consortium and define distinct color spaces for individual devices, such as monitors and printers. This assures printed output will match the appearance on your monitor, assuming the devices support ICC color profiles. To manage the ICC color profile associated with an image, select the image and open the “ICC Color Profile” pre-processing tool from the image toolbox.
If there is already an associated color profile, it will be displayed. To assign a new color profile, open the drop-down list and choose the color profile for the device that recorded the original image – typically your digital camera or your scanner. (The drop-down list will only show color profiles for the RGB color space.)
When images are loaded that have new ICC color profiles, then those profiles are added automatically to the “ICC Color Profile” list and can be used with other images.
You can set default color profiles to be associated with images that are loaded from specific sources. Choose from the Menu Bar: “Preferences” → “Image Archive → “ICC Color Profile.”
The “Cameras” list includes all models found in the Exif descriptors anywhere in the Image Archive. From the “File Extension” list, choose a graphics file type used by the specific camera. From the “ICC Color Profile” list, choose the default color profile to be associated with the selected camera/file extension combination. You can use the “Add” button to import new ICC color profiles from disk or other media. Click the “Apply” button to save the default color profile association.
Resize Original
The size of digital images can be measured in two ways:
- Pixel Size
Pixel size (for example 1024 x 768 pixels) defines the number of color dots that comprise the image. A large number of pixels requires more storage space, but provides better resolution since more detail was recorded. Images with a large pixel size are suitable for high quality and large prints. An image with a small pixel size is good for emails and web sites, but nothing more. - Print Size
The printed size of an image, measured in inches or cm, is a function of its pixel size and the printer resolution (for example 300 DPI). A high resolution printer prints pixels closer together, resulting in a smaller output. A lower resolution printer will print a larger print, since the number of pixels remains the same, only the distance between them changes. Best results are accomplished with an image that has a large pixel size printed on a high resolution printer.
For maximum flexibility, StudioLine will catalog images without changing the pixel size. During export or for sending emails, you can choose a pixel size to suit your needs (see chapters “Exporting” and “Sending Images via Email”). When printing, you can choose a suitable print size (see chapter “Printing – Custom Print”).
StudioLine does allow you to permanently reduce the pixel size of original images. This may be useful if you scanned an original in better resolution than you ever expect to need. You should keep in mind, however, that both print and internet technology keeps advancing with disk storage becoming increasingly affordable. In a few years you could find yourself scrambling for that original size, which may have seemed excessive today.
Preparing to Resize
Because resizing causes a loss of resolution, your final image will have superior quality if you first perform all other pre-processing tasks. From the Image Toolbox, choose “Crop and Rotate” to define the ideal cut-out area for your images. Choose “Red-Eye Removal” to correct any discolored pupils. Also, any touch-ups you may want to do are easier to perform before resizing and will look more convincing later. Only after these preliminary steps are complete, choose one or multiple images and click on “Resize Original” in the Image Toolbox. StudioLine opens the “Resize Original” window.
Similar to the “Export” window, you can save and recall frequently used settings.
Image Size
The “Image Size” drop-down menu offers a variety of options, including common standard sizes. The choice “Use Original Image Size” will retain the current size when using this window to convert between graphics formats instead (for example from TIFF to JPEG).
“Custom” activates the width and height controls to define any custom size. The standard or custom size you choose defines a bounding rectangle into which StudioLine will proportionally scale the images. Consequently, one side of the resized image (unless it’s a square) will be smaller than the chosen “Maximum Size,” if the selected width/height proportions do not match the image’s proportions. Enlarging images produces poor image quality and is therefore not recommended.
The option “Automatically Adapt to Orientation,” keeps your portrait orientation images portrait, and your landscape orientation landscape. Let us say you specify an image size of 640×480 pixels, then a portrait orientation image will be 640 pixels high, whereas a landscape orientation image will be 640 pixels wide. The long side will always receive the larger amount of pixels. This saves a lot of extra steps and headaches.
Next to the image size input fields, you can choose the unit of measurement as pixels, inches, or centimeters. That is helpful if images are later emailed to be printed at a given paper size. The field “DPI” will let you control the print resolution.
Format
Near the bottom of the panel you select the file format. The default is “JPEG,” which uses a very effective compression algorithm to reduce file size while retaining optimum image quality. JPEG format gives you the further option to customize image quality and file size as you need it. The higher the quality, the more memory space the file will use. The lower the file size, the lower the image quality, the quicker the image will load on a web page or in an email.
Other file formats have a static image quality, equivalent to the original quality. These formats have high disk space requirements.
de/classic/image_preprocessing.1384193707.txt.gz · Zuletzt geändert: 2013/11/11 13:15 von henning_stummer